
Zinnia Growth Stages: Understanding Zinnia Life Cycle
If you’re looking to understand the different growth stages of a zinnia, you’ve come to the right place! In this article, we’ll walk you through the life cycle of a zinnia, from seed to flower to seedling to mature plant. We’ll discuss the different growth stages, what they mean for your zinnia, and how you can help it reach its full potential. So whether you’re a beginner or an experienced grower, read more about the Zinnia Growth Stages!
Table of Contents
Plant Growth Stage 1: Germination
Germination, which occurs when the seed’s outer shell splits open and roots form, marks the beginning of the first stage of a zinnia’s lifecycle, just like it does for other plants. Zinnia seeds need 7 to 10 days to germinate after being planted.
If you plan to plant zinnia seeds in an outdoor garden, we advise clearing the area of weeds and other plants that might hinder the plant’s development. Additionally, a day with little to no wind is ideal for sowing the seeds.
To guarantee that at least one zinnia plant germinates, plant 1–2 seeds. Keep the soil moist but not soggy. Add peat moss to the area where you’ve planted seeds to preserve moisture levels. Plant seeds when the temperature is between 69-76°F to help ensure germination.
Plant Growth Stage 2: Growth
As the zinnia sprouts appear, keep the soil damp. Apply just enough water twice daily to rehydrate dry soil, preferably in the morning and late in the day. Since frequent watering can wash away the soil’s nutrients, fertilizer addition may be a good idea. For the sprout to grow, it also needs at least 6 to 8 hours of direct sunlight.
Once your zinnias have grown to a height of at least 6 inches in a planter or flowerpot, move them to your garden or a bigger container. By doing this, the roots can mature fully. After being moved, the sprouting zinnia should be placed in a sunny area with at least 6 hours of direct sunlight.
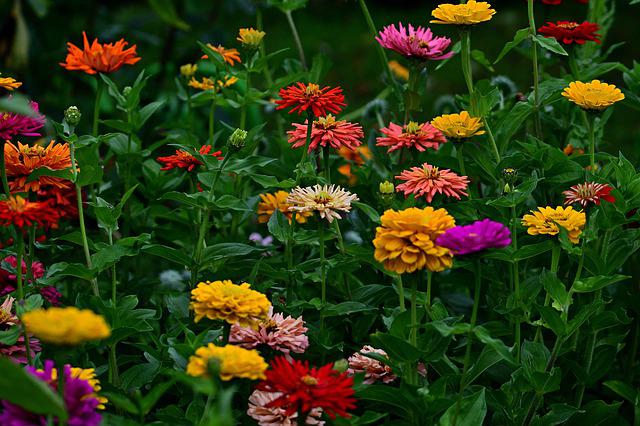
Plant Growth Stage 3: Flowering
At this point, your zinnias should be in full bloom. To prolong the blooming process and encourage sturdier petals, fertilize with a liquid fertilizer solution once every two weeks at half strength. Watering can become less frequent as the flowers wilt. However, they still need to be watered twice daily when the soil is dry but don’t let the pots or planters sit in water for more than an hour to prevent root rot.
On the stem of each zinnia plant, there will be one flower. The flower can be one to seven inches in diameter and come in various colors, including white, yellow, orange, pink, red, lilac, purple, and multicolored. Zinnia blooms can have a single row of pointed, curvy, or twisty petals or multiple rows of these petals. From the middle of summer until the first freeze, zinnias bloom. After the first freeze, zinnias will not bloom again until next summer.
Zinnias are well-known for their capacity to continue blooming for an exceptionally extended period. There are many different estimations regarding how long the blooms will remain on zinnias, just as there are different experiences with each individual due to the way genetics can mutate DNA. Zinnias are a type of flowering plant.
The amount of time it will take someone to keep the blooms of a zinnia alive will be somewhere between sixty days and approximately five months.
Plant Growth Stage 4: Pollination
Hummingbirds and butterflies can pollinate zinnias because they are attracted to the blooms. Since it has both reproductive organs, this plant can also self-pollinate (stamens and pistons). Once the zinnias have finished blooming, you can trim the petals off the stem. This will prevent them from producing flowers again, resulting in a bushier plant. Remove any weeds or other debris from around the zinnia plant before planting. Then, prepare a potting soil mix by adding 2 parts garden soil and 1 part sand. Give the zinnia a good watering before placing it in the pot.
Plant Growth Stage 5: Retrieving Seeds
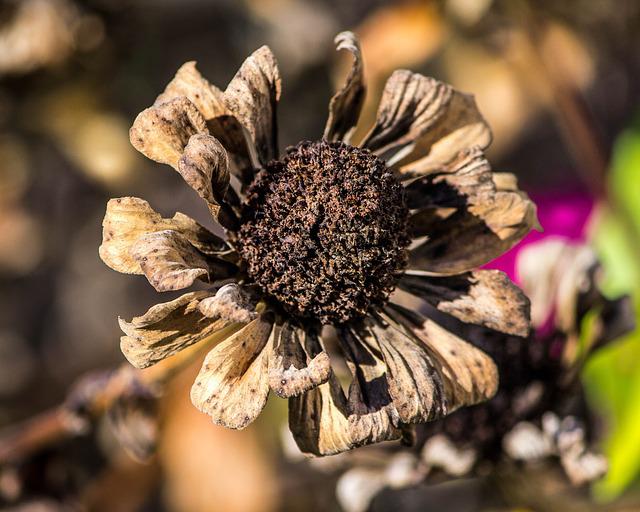
When the zinnia flowers have finished blooming, the petals will start to fall off. Once all the petals have fallen off, detach one or two pistons from the stem and place them in a jar of water. Within a week, you should see seeds forming on these pistons. Then let them dry for another 2-3 weeks until they become brown and brittle. A bloom harvested too soon may contain immature seeds that won’t sprout. When the flower turns dark brown and is completely dry to the touch, you’ll know it’s dried out completely. Before storing seeds for future planting, spread them out on a mesh screen to ensure they are dry on both sides.