
Does Astrantia Come Back Every Year?
Also known as Hattie’s pincushion and Masterwort, Astrantias are summer-flowering perennials that thrive in mixed beds and borders. When Astrantia blooms, it lasts for a long time, from early summer to the fall. If you have a lot of space in your garden, you should grow more hardy-spreading plants than you need. They are great for flower arrangements and can last long when cut. While astrantias resemble sun-loving plants such as the scabious and sea thrift with starry, convex flower heads, most astrantia varieties are shade-loving. You should always grow more than you need in your garden to get the most out of these hardy-spreading plants.
Table of Contents
What Does Astrantia Look Like?
Around two feet long, these plants have a wide range of colors. Since this plant is in the same family as carrots, the leaves look like carrots or Italian parsley. They are 3″ to 6″ long and have 3 to 7 toothed lobes.
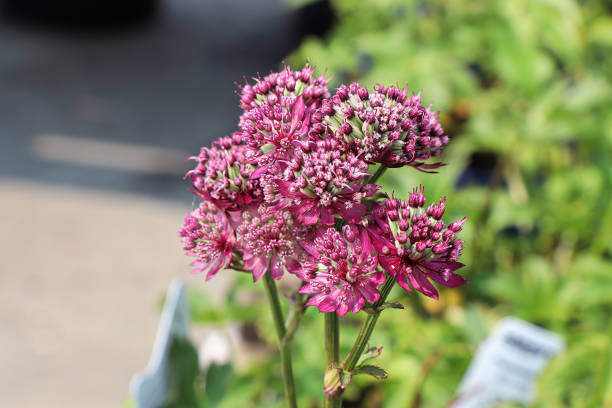
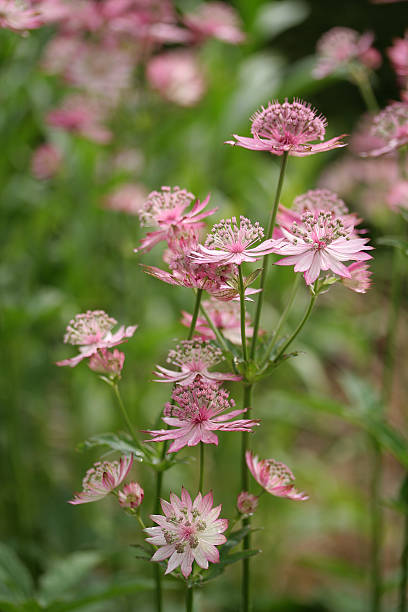
These plants have ruby red or white flowers that look slightly different from other flowers. They look like a firework or a star because they are in groups of florets close together and have petals-shaped bracts around them. There are no leaves on these stems, which are 24″ tall.
If you look around, you’ll see different kinds of flowers, like Buckland, which has pink flowers, or Claret, which has red flowers.
Taking Care of Astrantia
When Astrantia gets a lot of water, it can thrive in full sun, where the foliage is lush, and the blooms are few. It can also thrive in full shade, where the foliage is lush, and there are few blooms. Ideally, Astrantia should be grown where they get a few hours of morning light and some shade the rest of the time. They should be in partial sun to some dappled shade when planting astrantias. This will help them grow and perform at their best. Astrantia can handle the cold winters of the north and midwest and a wide range of growing conditions across the country. It doesn’t do well with the combined heat and humidity of the south.
Even if you have heavy clay soils, Astrantia can grow there. It prefers slightly acidic and light-rich loam soils that keep water in the soil but drains off any standing water. To add organic nutrients to your soil, mix things like compost and dried leaves into it. You can also add used coffee grounds. Coffee grounds will also make the soil acidic enough for the Astrantia to be happy. The crown of your bare root astrantia should be about 12 to 1 inch below the soil’s surface. The roots should be spread out and down. Fill in with soil that isn’t too dense. Then, mulch to keep the moisture level even. Water the soil often and thoroughly to keep it at a fairly even moisture level. It won’t be able to withstand long periods of dry soil.
Stake in exposed areas and water freely when it’s dry. Cover the soil with a layer of compost or well-rotted manure in April and May to keep it moist.
After the first flush of flowers in July, the entire plant can be cut down to the ground level like the geranium (cranesbill) to stimulate new growth and further flowers.
The flower heads can be left on the plants throughout the winter to create a beautiful architectural effect. On the other hand, Crossbred cultivars are prolific self-seeders, and they don’t always reproduce. The more vigorous self-sown reversals can be prevented by deadheading named varieties. In November, remove all of the plants’ foliage to the ground level.
Pest and Diseases
Keep an eye out for slug damage, but they don’t seem to be that bad in most cases. In bad weather, powdery mildew can happen because the soil is wet. Slugs are drawn to the young, growing shoots. For mildew, try to remove the leaves that have it and spray them with a fungicide.
Propagating Astrantia
You can’t help but be mesmerized by the beauty of Masterwort’s delicate and stunning flowers! All of them are unique and can instantly add character to any garden or home. We need to figure out a way to keep these babies with us for as long as possible while also producing more of them. The good news is that these plants can be easily propagated through division and seed.
To divide mature Astrantia plants:
- Dig them up in the spring or fall and separate them.
- To avoid damaging the roots, divide the clump half using a spade.
- Just replant the divided parts in their permanent locations and continue to care for them as normal.
When to Plant Astrantias?
The best time to start Astrantia plants from seed is in the fall. Start cold stratification as soon as the seeds have been removed from their mother plants. Digging a hole and planting the seeds in it is the first step. Germination and growth usually occur on their own in the spring.
Where to Plant Astrantias?
Astrantia thrives in soil that is moist and rich in humus, and it grows best in that type of soil. Loamy soil with much organic matter is ideal, and sandy soil usually doesn’t hold enough water. If clay soils stay wet and don’t dry out in hot weather, these plants can grow there, too. As a rule, it will thrive in the dappled shade from trees in a woodland or forest garden. Though, it’s worth noting that some plants that are darker in color will do better in a sunny place. This means that you should think about how different grapes will work together.
Another place where you might find Astrantia is under trees or shrubs, or in the space between them, in a wet garden bed or border. Astrantia is a good plant to put together in groups.
How to Plant Astrantias?
- Select a moist, rich soil location and is in a part shade situation.
- To make the bed as level as possible, turn the soil under 6-12 inches, remove any debris, and lightly rake it.
- All gardens benefit from organic matter (leaf mold, compost, well-rotted manure). Still, newly constructed neighborhoods are especially in need of it.
- To accommodate the bare root, create a deep and wide hole.
- Make sure the plant’s crown is at or just below ground level when planting it.
- Allow a 45-degree angle in the direction of root spread from the crown. The crown should not bunch up the roots, which should spread out like a pair of stretched fingers. Constructing a mound of soil in the bottom of the hole and spreading the roots around it may be beneficial. The crown should be roughly level with the ground when placing the roots.
- Get rid of air pockets by tamping down the soil around the roots. Fill the soil to the crown, where the top growth and leaves will begin to appear. Roots should be firmly in contact with the soil beneath the crown.
- Take care to saturate the roots and soil thoroughly.
- Before applying mulch, wait for new growth to appear.